Anchoïade: Anchovy Cream

AnchovyPaste-126R0083.jpg

Each day in cooking class we prepare at least one or two appetizers, a sign that it’s time to open a bottle of wine and relax. And this is a perennial favorite. Throughout Provence anchoïade (anchovy cream) is a popular starter, often used as a dip for a selection of raw vegetables. Recipes vary dramatically from cook to cook and I like to keep mine simple, with just a trio of ingredients: top-quality anchovy fillets cured in olive oil, capers, and cream.

Makes 1/2 cup (125 ml) 

Equipment

A mini food processor or a standard food processor fitted with a small bowl.

INGREDIENTS

One 2.82-ounce (80 g) jar Italian anchovy fillets in olive oil (about 20 fillets)
1 tablespoon capers in vinegar, drained
1/4 cup (60 ml) light cream

METHOD

Combine the ingredients in the bowl of the food processor or a blender and process to a chunky consistency. Use as a dip for raw vegetables, to prepare Anchovy Bites (recipe in The French Kitchen Cookbook), or as a sandwich spread.

(Store in an airtight container in the refrigerator for up to 3 days.)


This recipe was first published in The French Kitchen Cookbook. All rights reserved. Please do not reproduce without permission.

Zucchini Carpaccio with Avocados, Pistachios + Pistachio Oil


Recipe demonstration begins at 32:18.


Neither my students nor I ever tire of this salad. It has all the qualities one looks for in a dish: crunch, smoothness, color, aroma. Serve with Crispy Flatbread (page 260 of Salad as a Meal), Tortilla Crisps (page 263 of Salad as a Meal) or toasted bread for added crunch. Don’t omit the fresh thyme here, for it plays an essential role in the color and aroma. 

4 servings 


Equipment

A small jar with a lid; a mandoline or a very sharp knife.  

Ingredients

1 tablespoon freshly squeezed lemon juice
1/4 teaspoon Lemon Zest Salt
3 tablespoons best-quality pistachio oil (such as Leblanc) or extra-virgin olive oil
4 small, fresh zucchini (about 4 ounces; 115 g each) trimmed at both ends
1 large, ripe avocado
1/2 cup salted pistachios  
4 fresh lemon thyme sprigs, with flowers if possible

Fleur de sel

Method

1.  In the jar, combine the lemon juice and flavored salt. Cover with the lid and shake to blend. Add the oil, and shake to blend. 

2.  With a mandoline or sharp knife, slice the zucchini lengthwise as thin as possible. Arrange the slices on a platter, and pour the dressing over them. Tilt the platter back and forth to coat the slices evenly. Cover with plastic wrap and let marinate at room temperature for 30 minutes, so the zucchini absorbs the dressing and does not dry out.

3.  Halve, pit, and peel the avocado, and cut it lengthwise into very thin slices. Carefully arrange the slices of marinated zucchini on individual salad plates, alternating with the avocado slices, slightly overlapping them.  Sprinkle with the pistachio nuts. Garnish with the thyme sprigs and flowers and fleur de sel.  Serve.

Wine suggestion

Favorite wine partners for avocado include a young Pinot Grigio, a crisp-style Chardonnay, and a fragrant, well-chilled Sauvignon Blanc.


This recipe was first published in Salad as a Meal
All rights reserved. Please do not reproduce without permission.

Heirloom Tomato Platter

Tomato salad platter JK.jpg

In summer, if the conditions are right, my vegetable garden will usually produce enough heirloom tomatoes to feed an army. Among my preferred varieties are kaki coing, black prince, noire de crimée, and striped germain with their dramatic colors and gentle acidity. But whether market bought or from my homegrown bounty, this simple platter is a favorite way to enjoy a tomato's fresh juicy sweetness. Here I have topped the tomato slices with ruffles of the firm Swiss cheese Tête de Moine, shaved with a special machine called a girolle, but any cheese of choice can be used here.

6 servings


Equipment

A cheese girolle, a mandolin or a very sharp knife; a large serving platter.

Ingredients

6 ripe heirloom tomatoes (about 1 1/4 pounds; 625 g), preferably of varied colors
6 thin ruffles of Tête de Moine cheese, created with a cheese girolle or cut into paper-thin slices with a mandoline or a very sharp knife.
A handful of fresh herbs, such as green basil, purple basil, shiso and Delfino cilantro, rinsed and patted dry
About 2 tablespoons Lemon-Olive Oil Dressing

Fleur de sel

Method

Arrange the tomatoes in overlapping layers on the serving platter. Garnish with the cheese and herbs. Drizzle the dressing over all and season lightly with fleur de sel.


This recipe was first published in The French Kitchen Cookbook
All rights reserved. Please do not reproduce without permission.

Manchego, Chorizo + Paprika Bread

ChorizoManchegoBrd-_MG_0790.jpg

This quick bread takes you on an instant trip to Spain. I love this sliced and toasted, with more cheese and chorizo on top as a welcome snack.

Makes 1 loaf (24 thin slices)


Equipment

A nonstick 1-quart (1 l) rectangular bread pan.

Ingredients

Oil, for oiling the pan
1 1/4 cups (180 g) unbleached, all-purpose flour
2 teaspoons baking powder
1/2 teaspoon fine sea salt
3 large eggs, preferably organic and free-range, lightly beaten
1/3 cup (80 ml) extra-virgin olive oil
1/3 cup (80 ml) plain whole-milk yogurt
5 ounces (150 g) Spanish Manchego cheese, cut into 1/4-inch (1/2 cm) cubes
2 ounces (60 g) Spanish chorizo, cut into 1/4-inch (1/2 cm) cubes
1 teaspoon hot Spanish paprika
20 pimento-stuffed green olives

Method

1.  Center a rack in the oven. Preheat the oven to 400°F (200°C). Lightly oil the pan.

2.  In a large bowl, combine the flour, baking powder, and salt. Mix to blend. In another bowl whisk together the eggs, oil, and yogurt.  In a third bowl, toss together the cheese, chorizo, paprika, and olives. Add the egg mixture to the flour mixture and stir to blend. Add the cheese mixture to the flour mixture and stir to blend. Add the cheese mixture and stir to blend.

3.  Pour the batter into the prepared pan. Smooth out the top with a spatula. Place the pan in the oven and bake until the bread is firm and golden, 25 to 30 minutes. Remove from the oven and place the pan on a rack to cool. Once it has cooled, unmold and serve it at room temperature, in thin slices.

Variations

Omit the cheese and chorizo and replace them with 1 tablespoon toasted ground cumin and 1 tablespoon toasted whole cumin seeds; or, for Curry Bread, omit the cheese and chorizo and replace with 1 tablespoon Homemade Curry Powder (page 282 of The French Kitchen Cookbook).


This recipe was first published in The French Kitchen Cookbook: Recipes and Lessons from Paris and Provence.

All rights reserved. Please do not reproduce without permission.

Miniature Goats Cheese + Onion Tarts

MinOnionGoatChesTatin-_DS_5651.jpg

These tasty, savory, miniature pastries are a huge hit in my cooking classes. There is always a great sense of satisfaction, when one removes a tray of these fragrant, golden nuggets from the oven. These are best warm from the oven but are also delicious at room temperature. They can serve as appetizers or as sides to a simple green salad.

Makes 24 miniature tatins


Equipment

A 2 3/4–inch (7 cm) round biscuit cutter; 2 baking sheets lined with baking parchment; a food processor; 2 nonstick petit four molds or mini muffin tins, each with twelve 2  1/2–inch (6.5 cm) cups, or a 24-cup mini-muffin pan.

Ingredients

A 14-ounce (400 g) sheet of Blitz Puff Pastry (page 294 of The French Kitchen Cookbook) or purchased all-butter puff pastry, thawed (see Note)
4 tablespoons (60 g) unsalted butter
1 pound (500 g) onions, peeled, halved lengthwise, and cut into thin half moons
Fine sea salt Coarse, freshly ground black pepper
4 ounces (125 g) soft fresh goat’s milk cheese
Grated zest of 1 lemon, preferably organic
3 large eggs, preferably free range and organic lightly beaten
1 teaspoon fresh lemon thyme or regular thyme leaves

Fleur de sel, for garnish


Note

In our tests, we have preferred Dufour brand frozen puff pastry available at most specialty supermarkets . See www.dufourpastrykitchens.com. (Please note I have no affiliation with the brand.)

Be sure to leave ample time for thawing frozen dough, at least 6 hours on the refrigerator.

Method

1.  Evenly center two racks in the oven. Preheat the oven to 400°F (200°C).

2.  With the biscuit cutter, cut out 24 rounds of pastry. (Note: you will get the most from the pastry if you begin on the outside and cut rings as tightly as possible from the outside. Then work from the next large ring inside. I usually get 31 rounds out of a sheet.) Arrange the rounds side by side on the baking sheets. Prick them with a fork and freeze for at least 10 minutes.

3.  In a skillet, melt the butter over low heat.  Add the onions and a pinch of salt, and sweat – cook, covered, over low heat until soft and translucent – about 10 minutes. Season with pepper.

4.  In the food processor, combine the goat cheese, lemon zest, eggs, and thyme leaves and process to blend. Add the cheese mixture to the onions in the skillet and stir to blend. Taste for seasoning.

5.  Spoon a tablespoon of the mixture into each mold or muffin cup.  Cover each one with a round of pastry.

6.  Place the molds in the oven and bake until the pastry is puffed and golden, 20 to 25 minutes. Remove from the oven and let cool slightly. Then remove them from the cups and turn them over, pastry side down. Serve warm or at room temperature, garnished with the remaining thyme leaves and fleur de sel.
 

Wine suggestion

The mineral-rich flavors of this blend of Marsanne, Clairette, Ugni Blanc and Bourboulenc with their touch of spice make this white wine –Domaine du Paternel Cassis Blanc de Bancs -- a perfect palate opener to pair with the tatins.

The secret

Make sure that you cut the pastry slightly larger than the diameter if the molds, since the pastry may shrink during baking.

Variations

Replace the goat cheese with grated cheddar and bits of bacon; with feta cheese; crabmeat and tarragon; or peas, scallions, and pancetta. Add herbs, bake as simple, lighter, “quiche-like” bites, without the pastry.


This recipe was first published in The French Kitchen Cookbook: Recipes and Lessons from Paris and Provence.

All rights reserved. Please do not reproduce without permission.

Walnut Bites: Italian Panpepato

Walnut Bites JK.jpg

These crunchy walnut bites are rather irresistible. And versatile. A darker version of the Italian panforte, they offer a pungent, forward flavor, laced with freshly ground black pepper, cinnamon, cocoa powder, candied lemon peel, raisins, and walnut halves. They are ideal to serve with a cheese course (a nicely aged Parmiggiano-Reggiano and a sip of vin santo works for me), or team them up with a slice of the cheese, stack the two on a toothpick, and serve as an appetizer.

Makes 32 bites


Equipment

A 9 1/2 x 9 1/2-inch (24 cm) square baking pan; baking parchment

Ingredients

1/2 cup (65 g) dried black currants or raisins
1/2 cup (125 ml) sweet wine, such as marsala, vin santo, or port
2 tablespoons (30 g) unsalted butter
3/4 cup (150 g) unrefined cane sugar, preferably organic, vanilla scented
1/4 cup (60 ml) intensely-flavored honey, such as chestnut
1/2 teaspoon fine sea salt
2 cups (250 g) walnut halves
3 dried figs, stems removed, chopped
1 cup (90 g) candied lemon peel, preferably organic, cut into fine cubes
1/4 cup (40 g) unbleached, all-purpose flour
1 teaspoon coarse, freshly ground black pepper
1 tablespoon plus 1 teaspoon unsweetened cocoa powder
1 teaspoon ground cinnamon, preferably Vietnamese cassia

Method

1.  In a small bowl, soak the currants or raisins in 1/4 cup (60 ml) of the wine for 1 hour.

2.  Line the baking pan with baking parchment, letting the parchment hang over the ends. (This will make it easier to remove the panpepato once it’s baked.) 

3.Center a rack in the oven. Preheat the oven to 350°F (180°C).

4.  In a small saucepan, melt the butter over low heat. Add the sugar, honey, and salt, heating just until blended.

5.  In a large bowl, combine the currants and their soaking liquid, the walnuts, figs, and candied peel, and stir to coat the walnuts. In another bowl, combine the flour, pepper, cocoa powder, and cinnamon, and stir to blend. Add the flour mixture to the currant mixture, along with the remaining 1/4 cup (60 ml) wine. Stir to evenly coat the walnuts. Add the butter mixture and stir again to blend evenly. The mixture will be very dense and sticky. Spoon the mixture into the parchment-lined pan and smooth it out with a spatula. (Note that the mixture will be a walnut brown as it is placed in the oven, and turns dark, almost black as it bakes.)

6.Place the pan in the oven and bake until bubbly, dark, and fragrant, about 35 minutes. The mixture will be sticky, but will firm up as it cools in the pan.

7.  Once it has cooled, cut the panpepato into very tiny bites. (Store in an airtight container at room temperature for up to 3 weeks.)

Wine suggestion

As an appetizer, I love these with a glass of Champagne. With the cheese course, try an Italian vin santo, a Sicilian Marsala, a Porto,  or a French vin doux naturel, such as the Grenache-based Rasteau from the southern Rhône.


This recipe was first published in The French Kitchen Cookbook: Recipes and Lessons from Paris and Provence.

Please do not reproduce without permission.

Mini Croque Monsieur

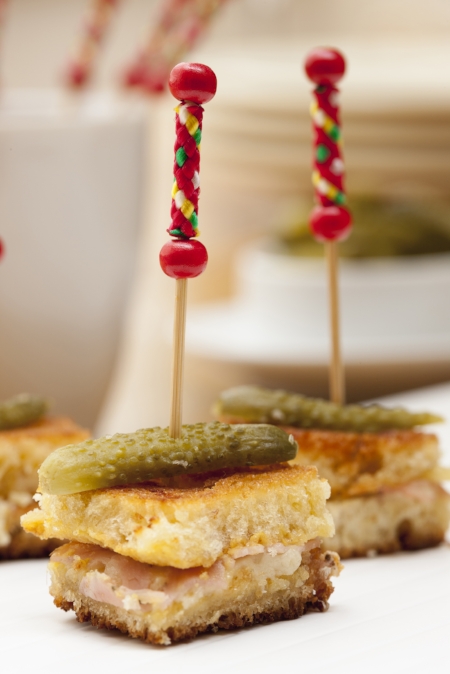
HamCheeseSqCornichons-126R8233.jpg

Is there a better palate opener than a single bite of a grilled ham and cheese sandwich, brightened by the tart crunch of a cornichon? Assemble all the ingredients for these baby croque monsieur sandwiches earlier in the day and then prepare them at the last minute, when guests and family are gathering.

Makes 18 squares, to serve 6 to 8


Equipment

A toaster; a nonstick skillet; toothpicks.

Ingredients

4 slices Saffron Honey Brioche or white bread (pain de mie), crusts removed
2 teaspoons French mustard
2 thin slices best-quality cooked ham, cut to fit 2 slices of the bread
About 1/4 cup (30 g) freshly grated Swiss Gruyère cheese or other hard cheese
1 tablespoon (15 g) clarified butter, ghee or unsalted butter
9 cornichons, halved lengthwise

Method

1.  Toast the brioche or bread. Coat one side of each slice with the mustard. Place a slice of ham over the mustard on two sides of the slices. Sprinkle the cheese over the ham. Place the other slices of bread, mustard-coated side down, on top of the cheese.  

2.  In the skillet, melt the butter over low heat.  Brown the bread evenly on both sides, about 1 minute per side. Cut each sandwich into 9 even squares. Pierce each cornichon half with a toothpick and secure the toothpick to the grilled bread. Arrange on a serving platter and serve warm, offering guests cocktail napkins.

Wine suggestion

Grilled cheese and champagne? Why not? I love Pierre Moncuit’s blanc de blancs, a medium-bodied, clean, and always reliable offering that has a purity that matches just about any opening taste.


This recipe was first published in The French Kitchen Cookbook. Buy the book here.

All rights reserved. Please do not reproduce without permission.
Cold Fry Frites

FRY Cold Fry Frites.JPG

Traditional fries are prepared by tossing potatoes in hot oil, usually cooking them twice: first, poaching them once in a not-too-hot oil and then, finishing them off in hotter oil. Not simple. In this method, the potatoes and oil begin cooking together from cold, totally defying all the rules of deep frying. The potatoes cook in a large pot, eventually reaching high heat, emerging golden and greaseless in less than 30 minutes. One pot, one cooking session, no blanching, no double frying, no electric deep-fat fryer, no thermometer. All you need is a good, large, heavy-duty cast iron or stainless pot.

6 servings


Equipment

A French-fry cutter (optional); 2 thick, clean kitchen towels; a 4 to 9-quart (4 to 9 l) heavy-duty saucepan or cast-iron pot; a kitchen timer; a wire skimmer or slotted metal spoon; two trays lined with paper towels; a warmed platter.

Ingredients

2 pounds (1 kg, about 4 large) russet potatoes (see Note)  
2-1/2 quarts (2.5 l) vegetable oil, such as sunflower, at room temperature
Fine sea salt

Note

Use firm, fresh potatoes. Rinse and soak them well to rid them of starch. The less starch in the potatoes, the crispier the fries will be.


Method

1.  Rinse the potatoes, peel them, rinse again, and cut lengthwise into 3/8-inch (10 mm) fries. (Precision is not essential here: I love the tiny, crunchy, almost-burnt bits that emerge from the fryer.)

2. Soak the potatoes in a bowl of cold water for about 5 minutes, changing the water when it becomes cloudy (at least twice), until the water remains clear. (Soaking releases the starch in potatoes, making them less rigid and less likely to stick together while cooking.)

3.  Drain the potatoes and wrap them in the kitchen towels to dry. Removing the excess liquid will speed up the cooking time and reduce the likelihood of the potatoes spattering once the oil is hot.

4.  Transfer the potatoes to the saucepan and set it over the stove. Pour the oil over the potatoes. Do not cover the pot. Set the heat to high, stirring the potatoes gently with a metal spoon to distribute and prevent sticking. (A metal spoon lets you feel if any potato bits are stuck to the bottom of the pan and scrape them up.)

5.  The oil should move from a peppy simmer to a boil in about 9 minutes. When the oil starts to boil, set a timer for 17 minutes. Stir the potatoes very gently every 3 to 4 minutes to prevent sticking and ensure even cooking. Don’t worry about over boiling – the oil should boil rapidly and evenly with no need to adjust the heat throughout the entire process.

6.  When the timer rings, the potatoes should have begun to take on color, turning from white to slightly golden, but will still have about 4 more minutes remaining until they are fully cooked (this time may vary depending on the type of potatoes and pot you use, how dry the potatoes are and the type of source heat etc. While in some kitchens they have taken about 21 minutes after coming to the boil, other tests have taken up to 40 minutes so pay close attention to visual cues). For the last few minutes watch the fries closely, stirring gently. Once they are a deep golden brown, taste one to make sure they are truly crisp and firm on the outside with a creamy interior. It should not be the least bit soggy, so resist the urge to remove them from the oil too soon. When you are happy with the consistency, carefully transfer the rest of the fries with the wire skimmer or a metal slotted spoon to the paper towel-lined tray to drain. Season with salt and serve immediately on a warmed platter.


This recipe was first published in My Master Recipes.
All rights reserved. Please do not reproduce without permission.